In this article, we’ll see how to configure Firebase cloud messages (FCM) and send messages with a Spring boot project.
Firebase is a fantastic product suite, but its documentation can sometimes be unclear. Although the documentation is rich, it can be difficult to see how to apply it in a specific case – languages and stacks vary, and I’ve found it requires a lot of time to see how to go from the documentation to implementation in your project.
Here, I’m going to document how I managed to set up my Spring boot backend project with Firebase Cloud Messaging functionality. For now, I won’t discuss how to receive them on the mobile app, or how to set up the Firebase project; there is sufficient documentation for these aspects online. (See https://firebase.google.com/docs/cloud-messaging/android/receive?authuser=0 for the setup of an Android client app).
Prerequisites
- A Firebase project, accessible from the console ( https://console.firebase.google.com/u/0/ )
- Any kind of client app, configured to receive the messages from the backend
How to set up a Spring Boot application with Firebase Cloud Messaging
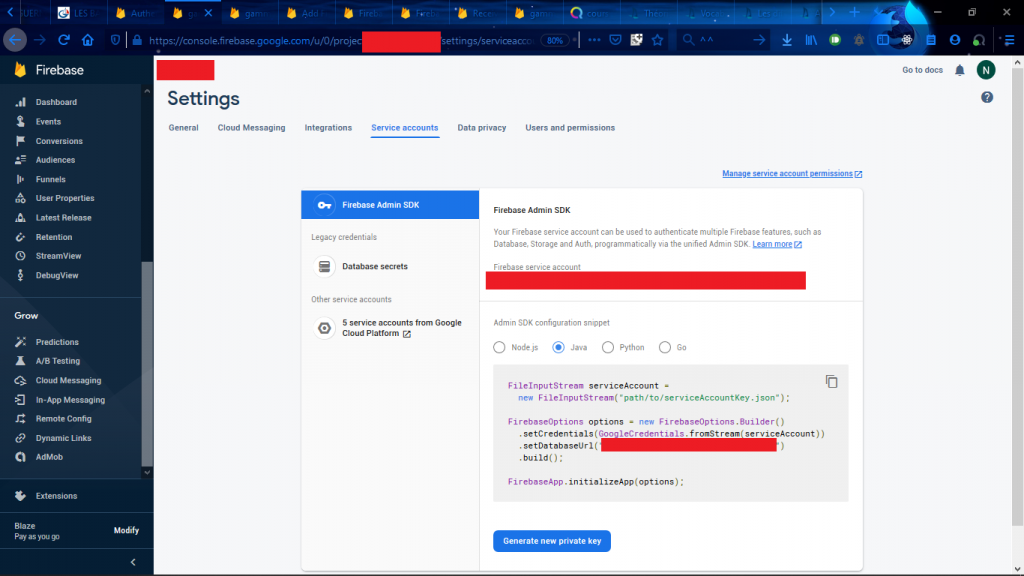
- Go to https://console.firebase.google.com/project/_/settings/serviceaccounts/adminsdk and select your project. Under Service accounts tab, click on button “Generate new private key”. Save this in your project, under the name “firebase-privateKey.json”. (Be careful: this is a sensitive file. Never commit it under public version control, for instance).
- In your project, configure your build.gradle as follows. This contains dependencies for Spring boot starter web, and Firebase admin. (If you’re using Maven, just add these dependencies like any others).
plugins {
    id 'java'
    id 'org.springframework.boot' version '2.1.1.RELEASE'
    id 'io.spring.dependency-management' version '1.0.8.RELEASE'
}

group 'fr.nevechris'
version '1.0-SNAPSHOT'

sourceCompatibility = 1.13

repositories {
    mavenCentral()
}

dependencies {
    implementation 'org.springframework.boot:spring-boot-starter-web'
    implementation 'com.google.firebase:firebase-admin:6.12.2'
}
- Create your backend’s Application.java class as follows:
package fr.nevechris.firebasespringpoc;

import com.google.auth.oauth2.GoogleCredentials;
import com.google.firebase.FirebaseApp;
import com.google.firebase.FirebaseOptions;
import org.springframework.boot.SpringApplication;
import org.springframework.boot.autoconfigure.SpringBootApplication;

import java.io.FileInputStream;
import java.io.FileNotFoundException;
import java.io.IOException;

@SpringBootApplication
public class Application {

    public static void main(String[] args) {
        SpringApplication.run(Application.class, args);
        initializeFirebaseAdmin();
    }

    private static void initializeFirebaseAdmin() {
        try {
            FileInputStream serviceAccount =
                    new FileInputStream("firebase-privateKey.json"); // Path of private key saved in previous step

            FirebaseOptions options = new FirebaseOptions.Builder()
                    .setCredentials(GoogleCredentials.fromStream(serviceAccount))
                    .setDatabaseUrl("YOUR DATABASE URL AS SHOWN IN CONSOLE")
                    .build();

            FirebaseApp.initializeApp(options);
        } catch (FileNotFoundException e) {
            System.out.println("Firebase key not found! Firebase Admin functionality will not work.");
        } catch (IOException e) {
            System.out.println("Error initialising Firebase Admin! Firebase Admin functionality will not work.");
        }
    }
}
Notes:
- The database URL you need to specify is the database URL you see in the Java code snippet, in the Firebase console (see screenshot above).
- The private key, passed in argument to the constructor of the FileInputStream, is the one you saved in previous step. Update path as necessary.
- Create a controller for the sake of testing. (This will not compile until you’ve done step 5 – for those like myself who like following tutorials with their brain off).
package fr.nevechris.firebasespringpoc;

import org.springframework.web.bind.annotation.RequestMapping;
import org.springframework.web.bind.annotation.RestController;

@RestController
public class MessageController {

    private MessageService service;

    public MessageController(MessageService service) {
        this.service = service;
    }

    @RequestMapping("/send-message")
    public void sendSampleMessage() {
        service.sendFirebaseMessage();
    }
}
- Create a service which will send the message.
package fr.nevechris.firebasespringpoc;

import com.google.firebase.messaging.FirebaseMessaging;
import com.google.firebase.messaging.FirebaseMessagingException;
import com.google.firebase.messaging.Message;
import org.springframework.stereotype.Service;

@Service
public class MessageService {

    public void sendFirebaseMessage() {
        // This registration token is the token of the device you're sending the message to. It's obtained when a
        // device registers with Firebase. In an Android app, it's accessible as follows:
        // FirebaseInstanceId.getInstance().getInstanceId().addOnCompleteListener(new OnCompleteListener<InstanceIdResult>() {
        //      @Override
        //      public void onComplete(@NonNull Task<InstanceIdResult> task) {
        //          if (!task.isSuccessful()) {
        //              Log.w(TAG, "getInstanceId failed", task.getException());
        //              return;
        //          }
        //          String token = task.getResult().getToken();
        //      }
        //  });
        String registrationToken = "whatever-your-device-registration-token-is";

        // Data of your message. Key/value pairs accessible from an Android client as follows:
        // instanceOfRemoteData.getData().get("firstName")
        Message message = Message.builder()
                .putData("firstName", "James")
                .putData("lastName", "Bond")
                .setToken(registrationToken)
                .build();

        // Send the message with registration token and body to device.
        String response = null;
        try {
            response = FirebaseMessaging.getInstance().send(message);
        } catch (FirebaseMessagingException e) {
            System.out.println("Error sending Firebase message: " + e.getMessage());
        }
    }
}
That’s it! Fire up your Spring boot app; now, when you send a request to http://localhost:8080/send-message , if your registration token is associated to a device, it will receive a message.
I hope this helped; the source code is available on my GitHub. https://github.com/ChrisLeNeve/fcm-springboot-poc . Let me know in the comments below if you have any questions!
If this article was helpful for you, feel free to support this article by buying me a coffee: